Applications
GUIDE
1. Preparation
Safety Gear: Wear appropriate safety gear including a welding helmet, gloves, long sleeves, and safety shoes to protect yourself from sparks, UV radiation, and hot metal.
Work Area: Ensure your work area is clean, well-ventilated, and free from flammable
materials.
2. Setup
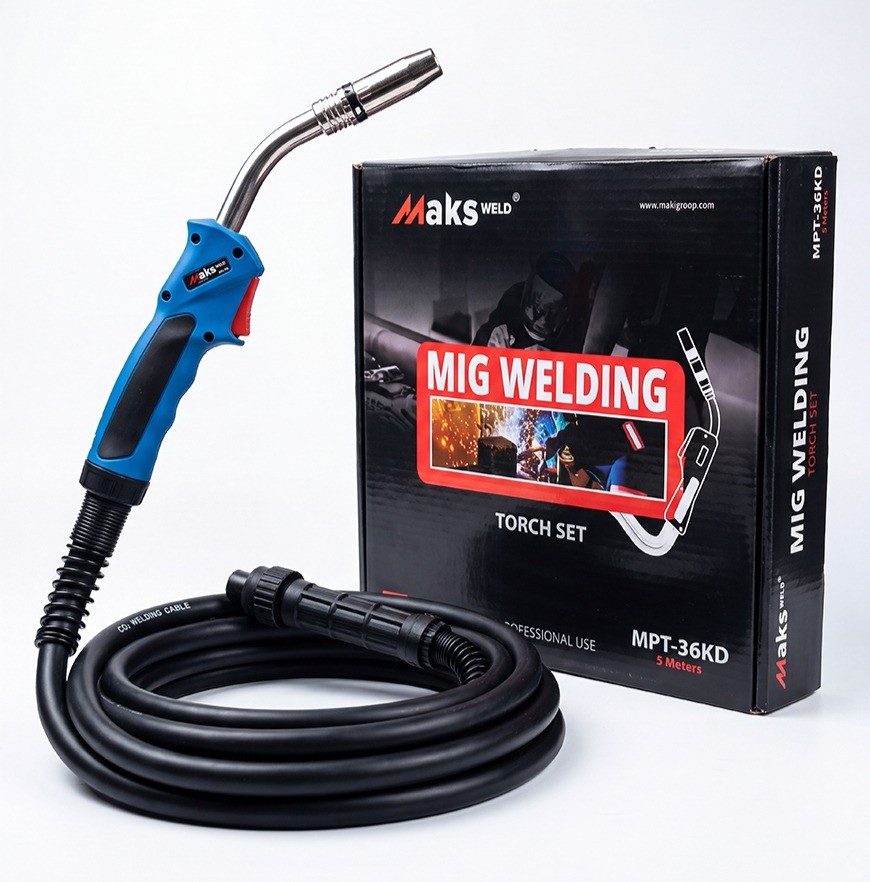
Connect the Torch: Attach the 36 KD MIG torch to the welding machine using the Euro connector. Ensure the connection is tight and secure.
Gas Supply: Connect the shielding gas (usually argon or a mix of argon and CO2) to the regulator and then to the welding machine. Set the gas flow rate according to the material and welding environment (typically between 10-20 L/min).
Wire Installation: Install the appropriate welding wire into the wire feeder. Feed the wire through the feeder and into the liner of the MIG torch. Ensure the wire feeds smoothly without jamming.
Select the Wire Size: Choose the correct contact tip and nozzle for the wire size you’re using. Common sizes for the 24 KD torch are 0.8mm, 1.0mm, and 1.2mm.
Set the Welding Parameters: Adjust the voltage, wire feed speed, and current settings on
your welding machine based on the material thickness, wire size, and type of weld you plan
to make.
3. Welding Process
Positioning: Hold the torch with both hands for better control. Position the torch at a slight angle (about 10-15 degrees) in the direction of your weld.
Arc Start: Press the trigger on the torch to start the flow of gas and wire. The arc will ignite, melting the wire and base metal to form the weld pool.
Travel Speed: Move the torch steadily along the joint at a consistent speed. The wire should melt into the weld pool, creating a bead. Adjust your speed to ensure a smooth, even bead.
Weaving (if needed): For thicker materials or wider welds, you might need to weave the torch slightly from side to side to cover the joint adequately.
4. Post-Weld
Release the Trigger: Once the weld is complete, release the trigger to stop the wire feed and gas flow.
Inspect the Weld: Examine your weld for consistency, proper penetration, and any defects such as porosity or undercutting.-Clean the
Torch: After welding, clean the nozzle, contact tip, and any splatter from the torch to maintain it in good working condition.
5. Maintenance
Check the Consumables: Regularly inspect and replace the contact tips, nozzles, and liners as needed. Worn-out components can cause inconsistent welding and poor-quality welds.
| Rating | 300 A CO2 |
| 270 A Mixed Gasses M 21 | |
| (DIN En 439) | |
| 60% Duty Cycle | |
| Wire sizes | 0.8 – 1.2 |
| Build group | Pos. | Description |
|---|---|---|
| Torch | 1.1 | Swan neck MB 36 KD, 50° bent |
| 1.3 | Swan neck AUT 36 KD, straight | |
| 1.4 | Swan neck AUT 36 KD, 45° bent | |
| 7 | Torch body, plastic | |
| Handle | 10 | Ergonomic handle, cpl., with trigger |
| Handle, top | ||
| Handle, bottom | ||
| Lock ring NW 31 | ||
| Screw 18×8 | ||
| Screw 3.5×9.5 | ||
| 18 | Trigger 2 pol. | |
| 38 | Handle tube AUT | |
| Cable assembly | 40 | Bikox power cable 3.00 m |
| Bikox power cable 4.00 m | ||
| Bikox power cable 5.00 m | ||
| w/o.fig | Outer cover for Bikox | |
| 40.1 | Hexagon nut M10x1 | |
| 44 | Trigger wire connector | |
| 45 | Insulating sleeve | |
| 46 | Trigger wire connector, male | |
| 54 | Cable support spring | |
| 56 | Cable support machine side | |
| 57 | Screw M4x6 | |
| 58 | Adaptor nut | |
| 59 | Central adaptor block KZ-2 with control leads | |
| Central adaptor block KZ-2 without control leads | ||
| 60 | Nut M10x1 | |
| 61 | O-ring 4×1 | |
| 62 | Trigger wire connector, female | |
| Wear parts | 70 | Gas diffusor, long life |
| Gas diffusor, white | ||
| 80 | Contact tip holder M6, 28.0 mm (short) | |
| 81 | Contact tip holder M6, 32.0 mm (long) | |
| 82 | Contact tip holder M8; 28.0 mm (short) | |
| 83 | Contact tip holder M8; 32.0 mm (long) | |
| 90 | Contact tip M6 ECu, Ø 0.83) | |
| Contact tip M6 ECu, Ø 1.03) | ||
| Contact tip M6 ECu, Ø 1.23) | ||
| Contact tip M6 CuCrZr, Ø 0.83) | ||
| Contact tip M6 CuCrZr, Ø 1.03) | ||
| Contact tip M6 CuCrZr, Ø 1.23) | ||
| Contact tip M6 ECu, Ø 0.8 for alu wire3) | ||
| Contact tip M6 ECu, Ø 1.0 for alu wire3) |
| Build group | Pos. | Description |
|---|---|---|
| Wear parts | 91 | Contact tip M6 ECu, Ø 1.2 for alu wire3) |
| Contact tip M8 ECu, Ø 0.83) | ||
| Contact tip M8 ECu, Ø 1.03) | ||
| Contact tip M8 ECu, Ø 1.23) | ||
| Contact tip M8 CuCrZr, Ø 0.83) | ||
| Contact tip M8 CuCrZr, Ø 1.03) | ||
| Contact tip M8 CuCrZr, Ø 1.23) | ||
| Contact tip M8 ECu, Ø 0.8 for alu wire | ||
| Contact tip M8 ECu, Ø 1.0 for alu wire | ||
| Contact tip M8 ECu, Ø 1.2 for alu wire3) | ||
| 104 | Gas nozzle, cylindrical ND Ø 19.0 | |
| 105 | Gas nozzle, conical ND Ø 16.0 | |
| 106 | Gas nozzle, conical ND Ø 12.0 | |
| 108 | Spot weld, gas nozzle ND Ø 20.0 | |
| 120 | Guide spiral liner insulated 1.5 / 4.5 blue with nipple for wire1) Ø 0.6-0.8 | |
| Guide spiral liner insulated 2.0 / 4.5 red with nipple for wire1) Ø 1.0-1.2 | ||
| 130 | Teflon core liner 1.5 / 4.0 blue with collet and O-ring for wire2) Ø 0.6-1.0 | |
| Teflon core liner 2.0 / 4.0 red with collet and O-ring for wire2) Ø 1.0-1.2 | ||
| Carbon Teflon core liner 1.5 / 4.0 with collet and O-ring for wire2) Ø 0.6-1.0 | ||
| Carbon Teflon core liner 2.0 / 4.0 with collet and O-ring for wire2) Ø 1.0-1.2 | ||
| 131 | Collet for core liner at Ø 4.0 | |
| 132 | O-ring 3.5×1.5 | |
| 133 | Guide tube for core liners up to Ø 4.0 | |
| 140 | Combined wire guide cpl. PA / brass 2.0 / 4.0 for wire Ø 1.0-1.2 | |
| 141 | Brass spiral made up with sleeve | |
| Explanations |
The positions indicating “per meter” are available in commercial lengths. |